关于图片的开发总结
前言
设置图片有两种方法,一种是只用<img /> 标签,另一种是给div或者其他元素设置背景background-image。
前者可以理解为前景图,后者理解为背景图。
下面我们来对两者进行分析。
一:background-image方式
列出background-image的几个属性帮助理解:
background-size: 设置整个背景图片的大小
background-size: 100px 100px;
是指把背景图片的大小设置为宽100px 高100px;
background-size: cover/contain
cover是指将图片按图片原本比例放大,让图片覆盖住div容器,多出来的部分裁剪。
contain是指在保持原比例的情况下,尽量撑满容器的情况下不超出容器,所以这种情况下,如果容器宽高比和图片宽高比不一致的话,图片不会填满容器,容器会留白。
background-position: 设置背景图片左上角相对于div左上角的位置
(1)background-position: -10px -10px;
是指以div左上角为(0,0)起始点,图片向左移动10px,向上移动10px。此时div的(0,0)就和背景图的(10,10)重合,所以在div内只能看到背景图(10,10)位置开始的图像
反之 background-position: 10px 10px;
是指以div左上角为(0,0)起始点,图片向右移动10px,向下移动10px。此时背景图的(0,0)就和div的(10,10)重合,所以背景图起始点在div的(10,10)位置,这时候div的(10,10)才出现背景图,(5,5),(0,0)等位置是没有背景图的
(2) background-position:50% 0%
positionX = (容器的宽度 - 背景图片宽度) * 百分比
positionY = (容器的高度 - 背景图片高度) * 百分比
(3) background-position:center top
与background-position:50% 0% 效果一致。
关键字:left或者top,bottom,center等值可以对应到百分比,和百分比的处理方式一致。
background-attachment:scroll/local/fixed
这个属性是在内容很多,出现滚动条的时候,用来确定背景图和内容之间的滚动关系的
可以参考这个来理解:https://codepen.io/Chokcoco/pen/xJJorg
scroll: 背景相对于元素本身固定,不随内容滚动。(默认值)
local: 背景相对于元素内容固定,内容很多时,背景岁随着内容滚动。
fixed: 背景相对于视口固定。即使一个元素拥有滚动机制,背景也不会随着元素的内容滚动。
二. <img> 和background-image区别
是否占位
img是html标签 ,占位;background-image是css样式,不占位;
但是使用img的时候如果我们希望宽度百分百,高度由图片宽高比例还确定的时候,就会出现高度不确定,导致图片在加载完之后,网页布局发生变化的情况。
使用background-image的时候我们一般会将容器大小确定,所以图片是否加载完成不会影响容器大小,所以网页布局不会 变化。
加载顺序
img是html元素,是网页结构的一部分,所以会在加载结构的过程中加载,而background-image是css样式,会等到结构加载完成(网页内容全部显示以后)才开始加载。所以img的图片会比background-image先加载。
三. 图片居中问题
第一种情况:图片本身比例不变(即不能让图片变形),让图片固定宽高比4:3的方式显示。
使用background-image很简单
设置容器宽高比为4:3,再给图片设置
1
2
3
4
5
6
.bg-img {
width: 100%;
height: 100%;
background-size: cover;
background-position: center center;
}所以重点就在于怎么让容器比例为4:3。如果 容器宽度确定,那么直接写死宽度和高度就可以了。如果容器宽度不确定(根据屏幕宽度来决定),那么可以用这些方式来保证容器宽高比
里面的第3点讲到了如何保证容器宽高比。
使用img
1️⃣ 我们让img外层套一个容器div,这个容器是图片要显示的范围。首先比较容器宽高比boxRate和图片宽高比imgRate。(注意我使用的是宽高比,即宽/高)
如果picRate > boxRate ,说明图片偏宽,那么让图片高度设置为容器高度,用此高度和picRate相乘得出来图片的宽度。这样图片宽度 就会大于容器宽度,再将图片宽度 宽出来的部分裁剪,就达到 将图片等比例扩大之后盖住容器的效果了,也就是cover的效果。
反之,如果picRate < boxRate,说明图片偏高,那么让图片宽度等于容器宽度,用此宽度除以picRate来得到图片高度,这样得到的图片高度会比容器高度大,再将图片高出来的部分 裁剪 。
2️⃣ 设置好图片宽度和高度之后 ,第二步是将图片 挪动到容器中间,让图片 显示中间部分,将两边多出来的部分裁剪掉。
第一种方式:可以通过 计算图片宽度和高度来计算margin-left或者margin-top。
代码如下:
1
2
3
4
5
6
7
8
9
10
11
12
13
14
15
16
17
18
19
20
21
22
23
24
25
26
27
28
29
30
31
32
33
34
35
36
37
38
39
<img @load="adaptImg"></img>
function adaptImg(event) {
const currentTarget = event.currentTarget;
// 使用jquery
const picWidth = currentTarget.naturalWidth;
const picHeigt = currentTarget.naturalHeight;
const picRate = picWidth / picHeigt;
const box = $(currentTarget).parent();
const boxHeight = $(box).height();
const boxWidth = $(box).width();
const boxRate = boxWidth / boxHeight;
// 不使用 jquery
// const picWidth = currentTarget.naturalWidth;
// const picHeigt = currentTarget.naturalHeight;
// const picRate = picWidth / picHeigt;
// const box = currentTarget.parentNode;
// const boxHeight = box.clientHeight;
// const boxWidth = box.clientWidth;
// const boxRate = boxWidth / boxHeight;
let finalWidth = 0;
let finalHeight = 0;
let marginLeft = 0;
let marginTop = 0;
if (picRate > boxRate) {
// asHeight
finalHeight = boxHeight;
finalWidth = picRate * boxHeight;
marginLeft = -(finalWidth - boxWidth) / 2;
currentTarget.style.height = '100%';
currentTarget.style.marginLeft = marginLeft + 'px';
} else {
// asWidth
finalWidth = boxWidth;
finalHeight = boxWidth / picRate;
marginTop = -(finalHeight - boxHeight) / 2;
currentTarget.style.width = '100%';
currentTarget.style.marginTop = marginTop + 'px';
}
}第二种方式:可以通过position:absolute配合margin: auto; 再设置left,top,right,bottom4个值来达到图片和 容器居中的效果。
1
2
3
4
5
6
7
8
9
10
11
12
13
14
15
16
17
.center-img-container {
position: relative;
overflow: hidden;
}
// 下面的是重点
.center-img-container img {
position: absolute;
left: -9999px;
right: -9999px;
top: -9999px;
bottom: -9999px;
margin: auto;
}
// 当设置left: -9999px;right: -9999px;right: -9999px;top: -9999px; bottom: -9999px;
// 四个数值要一样。记得margin要设置成auto
// 当四个值都设置成-9999px作用于图片比容器大的时候。
// 当四个值都设置成0作用于图片比容器小的时候。四. 图片模糊加载问题
思路: 一开始的时候,将img的src赋值为一个尺寸比较小的图片地址,并在img元素上添加一个data-src属性(清晰图片的地址),当元素处于视图中时,创建一个新的图片元素,将此新图片元素src赋值为之前img的data-src值,当新建的图片加载完成的时候,对之前img的src进行替换,这样就将模糊图片替换成了清晰图片
1
2
3
4
5
6
7
8
9
10
11
12
13
14
15
16
17
18
19
20
21
22
23
24
25
26
27
28
29
30
31
32
33
34
35
36
37
38
39
export const lazyLoadImg = () => {
// 滚动加载出来的元素可以懒加载
$(window).on('scroll', function() {
clearTimeout(loadInterval);
var loadInterval = setTimeout(function() {
$('.lazy-image').each((index, item) => {
isElementInViewport(item) && loadImg(item);
});
}, 100);
});
$('.lazy-image').each((index, item) => {
loadImg(item);
});
};
function loadImg(item) {
const $item = $(item);
if ($item.data('status') === 'loading' || $item.data('status') === 'loaded') {
return;
}
$item.data('status', 'loading');
const img = new Image();
const dataSrc = $item.attr('data-src');
img.onload = () => {
$item
.attr('src', dataSrc)
.removeClass('lazy-image')
.data('status', 'loaded');
};
img.src = dataSrc;
}
function isElementInViewport(el) {
var rect = el.getBoundingClientRect();
var threshold_x = 0;
var threshold_y = 100;
return rect.top >= 0 - threshold_y && rect.left >= 0 - threshold_x && rect.top <= window.innerHeight + threshold_y && rect.left <= window.innerWidth + threshold_x;
}
dataURL,canvas,file(Blob),objectURL之间的转化关系
一:四者之间的关系
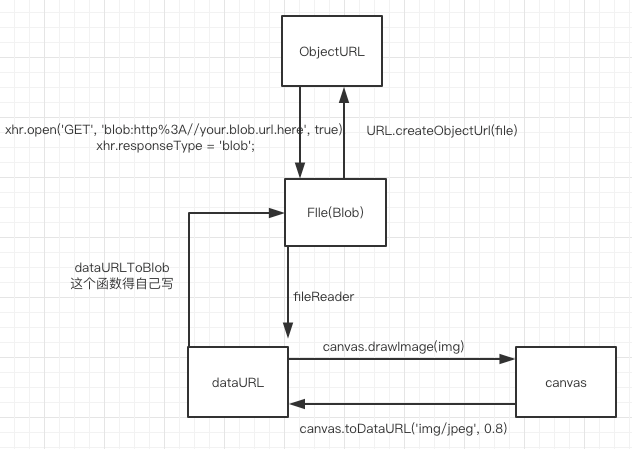
二:解释四者之间的关系
从File或者Blob转化为ObjectURL
1
2
objectURL = URL.createObjectURL(object);
// object:A File, Blob or MediaSource object to create an object URL for.从ObjectURL转Blob
1
2
3
4
5
6
7
8
9
10
11
var xhr = new XMLHttpRequest();
xhr.open('GET', 'blob:http%3A//your.blob.url.here', true);
xhr.responseType = 'blob';
xhr.onload = function(e) {
if (this.status == 200) {
var myBlob = this.response;
// myBlob is now the blob that the object URL pointed to.
}
};
xhr.send();
// 或者利用其他发请求的库也可以,主要是上面的xhr.responseType = 'blob';从 File转dataURL
使用 fileReader
1
2
3
4
5
6
7
8
9
10
11
12
13
function previewFile() {
var preview = document.querySelector('img');
var file = document.querySelector('input[type=file]').files[0];
var reader = new FileReader();
reader.addEventListener("load", function () {
preview.src = reader.result;
}, false);
if (file) {
reader.readAsDataURL(file);
}
}从dataURL转File(Blob)
1
2
3
4
5
6
7
8
9
10
11
12
13
14
15
16
17
18
19
20
21
22
23
24
function dataURItoBlob(dataURI) {
// convert base64/URLEncoded data component to raw binary data held in a string
var byteString;
if (dataURI.split(',')[0].indexOf('base64') >= 0)
byteString = atob(dataURI.split(',')[1]);
else
byteString = unescape(dataURI.split(',')[1]);
// separate out the mime component
var mimeString = dataURI.split(',')[0].split(':')[1].split(';')[0];
// write the bytes of the string to a typed array
var ia = new Uint8Array(byteString.length);
for (var i = 0; i < byteString.length; i++) {
ia[i] = byteString.charCodeAt(i);
}
return new Blob([ia], {type:mimeString});
}
// 使用方法如下
var dataURL = canvas.toDataURL('image/jpeg', 0.5);
var blob = dataURItoBlob(dataURL);
var fd = new FormData(document.forms[0]);
fd.append("canvasImage", blob);dataURL和canvas之间的转换比较简单,如图所示
canvas和File之间的转换需要经过dataRUL做中间人,暂时无法直接转化
https建立过程
我们都知道HTTPS能够加密信息,以免敏感信息被第三方获取。所以很多银行网站或电子邮箱等等安全级别较高的服务都会采用HTTPS协议。
HTTPS简介
HTTPS其实是有两部分组成:HTTP + SSL / TLS,也就是在HTTP上又加了一层处理加密信息的模块。服务端和客户端的信息传输都会通过TLS进行加密,所以传输的数据都是加密后的数据。具体是如何进行加密,解密,验证的,且看下图。
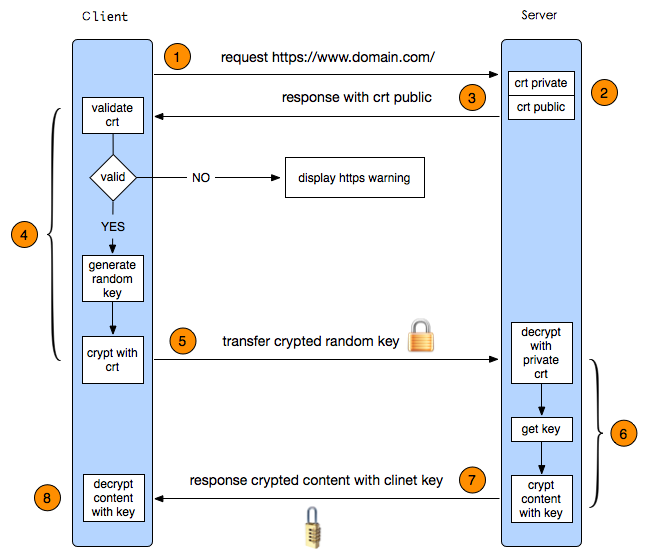
1. 客户端发起HTTPS请求
这个没什么好说的,就是用户在浏览器里输入一个https网址,然后连接到server的443端口。
2. 服务端的配置
采用HTTPS协议的服务器必须要有一套数字证书,可以自己制作,也可以向组织申请。区别就是自己颁发的证书需要客户端验证通过,才可以继续访问,而使用受信任的公司申请的证书则不会弹出提示页面(startssl就是个不错的选择,有1年的免费服务)。这套证书其实就是一对公钥和私钥。如果对公钥和私钥不太理解,可以想象成一把钥匙和一个锁头,只是全世界只有你一个人有这把钥匙,你可以把锁头给别人,别人可以用这个锁把重要的东西锁起来,然后发给你,因为只有你一个人有这把钥匙,所以只有你才能看到被这把锁锁起来的东西。
3. 传送证书
这个证书其实就是公钥,只是包含了很多信息,如证书的颁发机构,过期时间等等。
4. 客户端解析证书
这部分工作是有客户端的TLS来完成的,首先会验证公钥是否有效,比如颁发机构,过期时间等等,如果发现异常,则会弹出一个警告框,提示证书存在问题。
接下来使用服务器证书里面的公钥进行服务器身份的验证。 客户端生成一个随机数给到服务器。 服务器对随机数进行签名(加密),并回传给到客户端。 客户端用服务器证书的公钥对随机数的签名进行验证,若验证通过,则说明对应的服务器确实拥有对应服务器证书的私钥,因此判断服务器的身份正常。否则,则任务服务器身份被伪造。这些都没问题才说明服务器是可信的。
如果证书和服务器身份 都没有问题,那么就生成一个随即值。然后用证书对该随机值进行加密。就好像上面说的,把随机值用锁头锁起来,这样除非有钥匙,不然看不到被锁住的内容。
5. 传送加密信息
这部分传送的是用证书加密后的随机值,目的就是让服务端得到这个随机值,以后客户端和服务端的通信就可以通过这个随机值来进行加密解密了。
6. 服务段解密信息
服务端用私钥解密后,得到了客户端传过来的随机值(私钥),然后把内容通过该值进行对称加密。所谓对称加密就是,将信息和私钥通过某种算法混合在一起,这样除非知道私钥,不然无法获取内容,而正好客户端和服务端都知道这个私钥,所以只要加密算法够彪悍,私钥够复杂,数据就够安全。
7. 传输加密后的信息
这部分信息是服务段用私钥加密后的信息,可以在客户端被还原
8. 客户端解密信息
客户端用之前生成的私钥解密服务段传过来的信息,于是获取了解密后的内容。整个过程第三方即使监听到了数据,也束手无策。
总而言之,就是:客户端利用有效证书确认服务器身份之后,将一个密钥 传给服务端,之后客户端和服务端利用这个密钥来加密数据。
关于date的一些记录
一. 关于GMT时间和UTC时间
GMT即「格林威治标准时间」(Greenwich Mean Time,简称G.M.T.),指位于英国伦敦郊区的皇家格林威治天文台的标准时间,因为本初子午线被定义为通过那里的经线。然而由于地球的不规则自转,导致GMT时间有误差,因此目前已不被当作标准时间使用。
UTC比GMT来得更加精准。其误差值必须保持在0.9秒以内,若大于0.9秒则由位于巴黎的国际地球自转事务中央局发布闰秒,使UTC与地球自转周期一致。不过日常使用中,GMT与UTC的功能与精确度是没有差别的。
协调世界时区会使用“Z”来表示
二. 关于时间戳
Unix时间戳表示的是当前时间到1970年1月1日00:00:00 UTC对应的秒数。
javascript时间戳指的是1970年1月1日00:00:00 UTC对应的毫秒数。
三. 时间数字字符串格式
RFC2822
1
2
YYYY/MM/DD HH:MM:SS ± timezone(时区用4位数字表示)
// eg 1992/02/12 12:23:22+0800ISO 8601
1
2
3
4
5
6
7
YYYY-MM-DDThh:mm:ss ± timezone(时区用HH:MM表示)
1997-07-16T08:20:30Z
// “Z”表示UTC标准时区,即"00:00",所以这里表示零时区的`1997年7月16日08时20分30秒`
//转换成位于东八区的北京时间则为`1997年7月17日16时20分30秒`
1997-07-16T19:20:30+01:00
// 表示东一区的1997年7月16日19时20秒30分,转换成UTC标准时间的话是1997-07-16T18:20:30Z
四. Date
返回结果为字符串————— Date 构造函数
① Date() 直接返回
1
2
3
Date()
// "Thu Aug 09 2018 19:09:07 GMT+0800 (中国标准时间)"
// Date()直接返回当前时间字符串,不管参数是什么② new Date()
而new Date()则是会根据参数来返回对应的值,无参数的时候,返回当前时间的字符串形式;有参数的时候返回参数所对应时间的字符串。
new Date()对参数不管是格式还是内容都要求,且只返回字符串
这里需要注意的是,月份month参数,其计数方式从0开始,而天day参数,其计数方式从1开始。
1
2
3
4
5
6
7
8
9
10
11
12
13
14
15
16
17
18
19
20
21
22
new Date(); // 什么都不传
//"Thu Aug 09 2018 19:09:07 GMT+0800 (中国标准时间)"
new Date(1293879600000); // 传时间戳
new Date('2011-01-01T11:00:00') // 2011-01-01T11:00:00
new Date('2011/01/01 11:00:00') // 2011/01/01 11:00:00
new Date('jan 01 2011,11 11:00:00')
new Date('Sat Jan 01 2011 11:00:00')
// 代表年、月、日、小时、分钟、秒、毫秒
new Date(2013, 0, 1, 0, 0, 0, 0)
// 所有能被Date.parse()方法解析的字符串,都可以当作参数。
new Date('2013-2-15')
new Date('2013/2/15')
new Date('02/15/2013')
new Date('2013-FEB-15')
new Date('FEB, 15, 2013')
new Date('FEB 15, 2013')
new Date('Feberuary, 15, 2013')
new Date('Feberuary 15, 2013')
new Date('15 Feb 2013')
new Date('15, Feberuary, 2013')1
2
3
4
5// Invalid Date
new Date('sss');
new Date('2011/01/01T11:00:00');
new Date('2011-01-01-11:00:00')
new Date('1293879600000');返回结果为时间戳
① new Date().getTime()
② new Date().valueOf()
③ Date.UTC()
1 | // 参数代表 年、月、日、时、分、秒、毫秒 |
④ Date.parse()
上面new Date()里面有 Date.parse()使用案例
时间对象操作
① get类
1
2
3
4
5
6
7
8
9
10
11getTime():返回实例距离1970年1月1日00:00:00的毫秒数,等同于valueOf方法。
getDate():返回实例对象对应每个月的几号(从1开始)。
getDay():返回星期几,星期日为0,星期一为1,以此类推。
getYear():返回距离1900的年数。
getFullYear():返回四位的年份。
getMonth():返回月份(0表示1月,11表示12月)。
getHours():返回小时(0-23)。
getMilliseconds():返回毫秒(0-999)。
getMinutes():返回分钟(0-59)。
getSeconds():返回秒(0-59)。
getTimezoneOffset():返回当前时间与 UTC 的时区差异,以分钟表示,返回结果考虑到了夏令时因素。② set类
1
2
3
4
5
6
7
8
9setDate(date):设置实例对象对应的每个月的几号(1-31),返回改变后毫秒时间戳。
setYear(year): 设置距离1900年的年数。
setFullYear(year [, month, date]):设置四位年份。
setHours(hour [, min, sec, ms]):设置小时(0-23)。
setMilliseconds():设置毫秒(0-999)。
setMinutes(min [, sec, ms]):设置分钟(0-59)。
setMonth(month [, date]):设置月份(0-11)。
setSeconds(sec [, ms]):设置秒(0-59)。
setTime(milliseconds):设置毫秒时间戳。set*方法的参数都会自动折算。以setDate为例,如果参数超过当月的最大天数,则向下一个月顺延,如果参数是负数,表示从上个月的最后一天开始减去的天数1
2
3
4
5var d = new Date ('January 6, 2013');
d // Sun Jan 06 2013 00:00:00 GMT+0800 (CST)
d.setDate(9) // 1357660800000
d // Wed Jan 09 2013 00:00:00 GMT+0800 (CST)1
2
3
4
5
6
7
8
9var d1 = new Date('January 6, 2013');
d1.setDate(32) // 1359648000000
d1 // Fri Feb 01 2013 00:00:00 GMT+0800 (CST)
var d2 = new Date ('January 6, 2013');
d.setDate(-1) // 1356796800000
d // Sun Dec 30 2012 00:00:00 GMT+0800 (CST)1
2
3
4
5
6
7
8
9// set类方法和get类方法,可以结合使用,得到相对时间。
var d = new Date();
// 将日期向后推1000天
d.setDate(d.getDate() + 1000);
// 将时间设为6小时后
d.setHours(d.getHours() + 6);
// 将年份设为去年
d.setFullYear(d.getFullYear() - 1);
参考链接2
用canvas画烟花
1 | <html> |
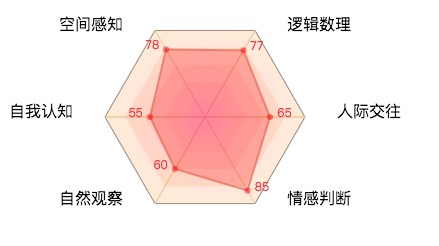
使用canvas画一个雷达图
一. 代码
1 | <html> |
二. 效果
import和require区别
先总结一下区别,之后再细聊:
- require是动态编译的,import是静态编译的。所以require后面的地址可以通过计算获取,import不能。
- require不会进行变量提升,import会。
- require导出的是一个拷贝值,import导入的是一个引用值(每个属性定义了getter)。
- require得到的变量可以修改,import得到的变量无法修改(因为es6里对于导出数据做了只读限制)
一. import 得到的变量是只读的,require得到的变量可以修改。
(1) Import
1 | // a.js |
1 | // test.js |
运行之后会得到:“a” is read-only
(2) require
1 | // test.js |
运行之后得到:
1 | a====== { a: 1 } |
只修改了test.js里面的数据
二. import 会进行提升,Import are hoisted。Require不会。
比如这个例子:
1 | // a.js |
由于 import 被提升所以这个例子会报 log undefined,用 babel 转义一下会得到:
1 | // a.js |
三. import静态编译,import的地址不能通过计算。require就可以。
例如 const url = “a” + “b”;
Import url 直接报错了
require(url)不会报错
所以require都会用在动态加载的时候。
四. require 输出的是一个值的拷贝, export 模块输出的是值的引用
对于require:如果导出的是基本类型,则得到的是一个值; 如果是对象,则得到的是一个对象地址的引用,总之就是拷贝了这个导出的值。
对于export:给module.exports上的每一个属性比如’name’,定义了一个属性描述对象Object.defineProperty(exports, ‘name’, { enumerable: true, get: getter },属性描述对象有一个getter,所以每次获取这个属性的时候其实都执行了函数getter,而不是像require对应的输出一样每次使用的都是缓存值
1️⃣rquire会对引入进来的数据进行缓存
在test.js里面require(‘’./a’)之后再修改a则只会修改a文件内的数据,(如果a是导出一个对象,则都会修改,因为是地址引用,test和a所指向的是一个内存。如果a导出的是基本数据类型,则test里面拥有的是一个副本,也就是前面说的对数据做缓存)
2️⃣import之后对数据做修改会同时影响test和a里面的数据
注意不能 import a from ‘a’; a = 1;
上面已经说了import 是只读的。
但是 import a from ‘a’; a.theProp = 1; 是可以的,因为这并没有改a的引用地址,只是加一个属性
五. 多次引用同一个文件,require和import 对于 都是只执行一次
在这个方面import 和require都是一样的,引用相同文件都是只执行一次。
注意:在查看了webpack打包结果之后发现
其实一个文件就是对应一个module对象,module对象里面有个属性是module.exports.
每个文件在最终都会变成一个函数的执行体,这个函数有三个入参:
module, module.exports, webpack_require
导入和导出方式
(1)在commonjs(也就是上面说的require)模块里,有两种导出方式:
module.exports = {a: 1, b:2}
exports.a = 1; exports.b = 2;
这两种是完全等价的。之所以不能写成exports = {a:1, b:2}是因为exports作为形参传进来之后,如果执行的是exports = {a:1, b:2z}这样的赋值语句,是不会改变传入的实参的。而我们的目的是改变传入的实参,所以需要写成上面的两种方式之一,这两种方式都是可以改变实参的。
require的时候可以直接拿到module.exports的值,然后再分别取出里面的属性。
(2)在ES(也就是上面说的import)模块里,有很多种导出方式:
1 | const a = {a1: 1; a2: 2}; |
export { a }; // 在module.exports 上定义一个a属性,属性值是a;
import { a } ;
exports const a = a;// 在module.exports 上定义一个a属性,属性值是a;
Import { a };
exports default a; // 在module.exports 上定义一个default属性, 属性值是a;
Import a;
对上面3种情况进行解释: import 的时候,如果不是对象结构赋值的话(也就是{ a }),会默认是import default,就像第3种情况,import a 会解析成import default as a,其实就是取出了module.exports的default属性。
现在假如这么写
1 | // a.js |
1 | // index.js |
记录一次官网开发
最近开发了一个官网首页,遇到几个问题,现在做一下记录,方便以后回顾。
一:宽高相关参数
- #####window.innerWidth与window.innerHeight
window.innerWidth与window.innerHeight:获得的是可视区域的宽高,但是window.innerWidth宽度包含了纵向滚动条的宽度,window.innerHeight高度包含了横向滚动条的高度(IE8以及低版本浏览器不支持)。
1 | window.innerWidth = width + padding + border + 纵向滚动条宽度 |
由于本次开发中,可视区没有滚动条,所以他们就代表了窗口可视区宽高。
window.outerWidth与window.outerHeight:获得的是加上工具条与滚动条窗口的宽度与高度。
1 | window.outerWidth = width + padding + border + 纵向滚动条宽度 |
document.documentElement.clientWidth与document.documentElement.clientHeight:获得的是屏幕可视区域的宽高,不包括滚动条与工具条,跟jquery的(window).width()与(window).height()获得的结果是一样的。
1 | document.documentElement.clientWidth = width + padding |
在本次开发中,本来想用这两个数据,但是发现在vue的mounted时候还不能获取到这个数据,所以最后用window.innerWidth和window.innerHeight代替了。
document.body.clientWidth与document.body.clientHeight:document.body.clientWidth获得的也是可视区域的宽度,但是document.body.clientHeight获得的是body内容的高度,如果内容只有200px,那么这个高度也是200px,如果想通过它得到屏幕可视区域的宽高,需要样式设置,如下:
1 | body { |
最关键的是:body的height:100%影响document.body.clientHeight的值。
body的margin:0,padding:0影响document.body.clientWidth的值。
二: 将一张与屏幕宽高不一致的图片,在不拉伸图片的情况下,作为屏幕的背景图
如果图片可以拉伸,那直接设置width:100%;height:100%;就可以了。但是这样就拉伸了图片不美观,设计师也不允许。如果不拉伸图片,可以用如下方法:
1 | getPageStyle () { |
设置图片backgroundSize:this.realWidth, this.realHeight
三: transfrom: scale(2) translateX(100px). 其实他会平移100*2px
1 | // 除以this.blockMoveXRate |
四: reset 3d的css样式的时候,不设置成0而是0.00001,为了解决safari闪烁问题
1 | this.$page.css({ |
五: 火狐perspective不继承,需要给每个3d元素设置
1 | .section { |
六: 设置transition: transform 0.1s 的3d效果的时候,需要把时间设置的很短,不然会出现元素自己缓慢移动的效果,无法形成3D视觉
http://www.jq22.com/yanshi6472
通过外层元素的旋转,内容元素的平移达到3d效果
1 | transition: transform 0.1s ease; |
1 | const xPer = e.clientX / WIDTH; |
网络原理知识记录
一:路由器
路由器也就是网关路由器, 在网络中的位置如下
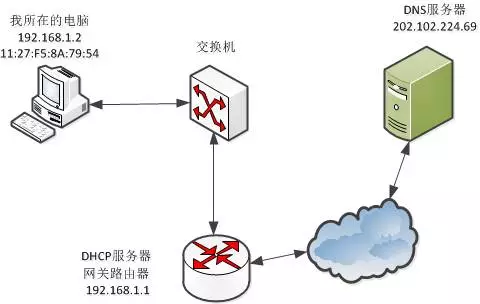
电脑想要上网,就需要经过网关。网关直接和ISP(联通)的网络相连,假如某台路由器有一个外网地址:61.52.247.112。
由于只有一个外网地址,如果都使用这个ip,局域网内部的电脑不能同时上网。所以需要一个办法让局域网内部的电脑能同时上网:NAT(网络地址转换)
1.网络地址转换
现在的路由器不仅仅是一个路由器,同时是一个DHCP服务器,DHCP也就是动态主机配置协议,其实就是给局域网内部的电脑分配ip用的。
现在这台路由器所在局域网内有一台电脑TP-Link 7954想要上网,路由器给他分配了一个ip是192.168.1.2 ,这是一个内网ip,所以这个ip本身是无法上网的。(每个路由器都可以给自己局域网内的电脑分配192.168.1.2的ip)。
注意:我们需要知道内网IP段有哪些
1 | A类:10.0.0.0-10.255.255.255 |
电脑TP-Link 7954想要上网必须经过这个路由器。现在电脑TP-Link 7954想要访问百度,他通过交换机发来一个数据帧:

路由器把数据链路层的外衣去掉,发现数据包的目标地址是115.239.211.112,路由器就知道这是要向外网发出请求了。于是路由器开始干下面的事情:
1️⃣路由器把IP数据包的源地址192.168.1.2替换成路由器从联通那里拿到的外网地址61.52.247.112。
2️⃣这还不够,路由器会创建一个新的端口号2001,把TCP数据包中的源端口也替换掉,数据包变成了这样:
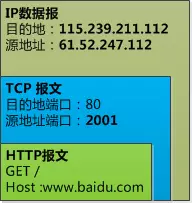
所以路由器就是把TCP层的端口号和IP层的源地址IP号替换掉,目的是让外部认为这是路由器自身发出的消息,外界根本不知道TP-Link 7954这台电脑。
然后路由器再给这个IP数据包穿上数据链路层的外衣,把数据包发送给联通的网络剩下的事情就不管了。
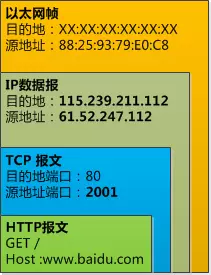
注意:以太网帧的mac地址,源地址已经是路由器的地址了,而不再是TP-Link 7954了, 因为路由器是我和联通网络之间的数据链路。
像上面那样替换源地址(包括源IP地址和源mac地址)和端口号就叫做网络地址转换,也就是NAT
当然不止TP-Link7954通过这个路由器上网,还有很多别的电脑也通过这个路由器上网,路由器需要把这些信息记录下来,形成这张表:
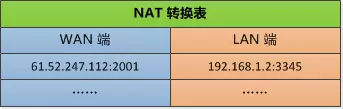
过了不久,百度网站的回复信息就会通过别的路由器转到这个路由器来,这个路由器需要反过来处理一下。
首先去掉数据链路层的外衣,发现TCP和IP数据包包含这样的消息:
目的地IP : 61.52.247.112 , 端口 2001
这时候去查表,找到192.168.1.2:3345,这就表明是发给TP-Link 7954的信了。
那就再次把数据报表中的IP地址和端口号改了,让TP-Link 7954 认为这个数据包就是路由器给他的。
就这样, 路由器成功的用区区一个外网的IP就支持了局域网内多个电脑的上网需求, 并且局域网内的电脑根本就不知道是怎么回事!
(在我看来,路由器就是一个代理功能)
2.路由器和交换机的区别
工作层次不同:
交换机工作在数据链路层(第二层)
路由器工作在网络层(第三层)
转发依据不同:
交换机转发所依据的对象:MAC地址(物理地址)
路由器转发所依据的对象:IP地址(网络地址)
主要功能不同:
交换机主要是用于组件局域网,在局域网内部使用
路由器主要是将交换机组建好的局域网连接起来,或者接入Internet
交换机能做的,路由器都能做,交换机不能分割广播域,路由器可以。路由还可以提供发防火墙的功能。
通俗的说:
交换机:转发数据
路由器:找路
交换机是连接一个局域网内的设备的,路由器是连接不同网络的设备
3. 特殊IP地址
1️⃣ 上面提到的内网IP段
2️⃣ 广播地址:255.255.255.255 。用于向局域网内广播信息
主机号全部为1的地址是子网广播地址,如:192.168.1.255
主机号全部为0的地址是代表该子网的网络地址,如:192.168.1.0
3️⃣ 0.0.0.0:所有未知的主机和目的网络(类似于默认匹配)